Interim ERC-20 ZIL Token Swap Tutorial
Swapping your interim ERC20 tokens is a simple process. We explain below the steps involved with some screenshots to guide you through the process. While swapping your tokens, you may pause at any step or sub-step and restart later at your convenience.
Introduction
Prior to the launch of the Zilliqa mainnet in 2019, the ZIL token, in the interim, was issued as an ERC-20 token on the Ethereum network. Those interim ERC-20 tokens were to be later swapped for native ZIL tokens on the Zilliqa mainnet.
The token swap process started in April 2019, a few months after the mainnet launch and ended in February 2020. The process was simple: Users were required to deposit their interim ERC-20 tokens to a centralized exchange and withdraw an equivalent number of native ZIL tokens on the Zilliqa network. Several well-known partner exchanges facilitated the swap, including but not limited to Binance, KuCoin, OKEx, Huobi, CoinHako, Upbit and Bithumb.
However, at the end of the swap period, we observed that 213,272,942.183558446345 interim ERC-20 ZIL tokens had remained un-swapped. The community has since been requesting to re-open token swap to allow those who missed out in 2019/2020.
Given that all major exchanges had moved away from ERC-20 ZIL tokens, we had to come up with a different solution to re-open token swap. X-Bridge to the rescue! By leveraging the recently released X-Bridge that connects Ethereum to Zilliqa and vice-versa, we have developed a decentralized token swap dApp that allows holders of interim ERC-20 ZIL to swap their tokens for native ZIL on the Zilliqa mainnet.
Does this concern me?
This tutorial does not concern users who own ZIL on the Zilliqa blockchain, but instead, it is only meant for those who own interim ERC-20 tokens on an Ethereum blockchain.
Is there a deadline for this swap too?
As this swap mechanism is fully decentralized, there is no deadline per se. However, we encourage all users to swap as soon as they can and be a part of a growing economy powered by ZIL. For example, once your tokens have been swapped, you could stake them on stake.zilliqa.com.
Token Contract Addresses
Interim ERC-20 ZIL: 0x05f4a42e251f2d52b8ed15e9fedaacfcef1fad27
Bridged ERC-20 ZIL (aka eZIL): 0x6EeB539D662bB971a4a01211c67CB7f65B09b802
Fees
The swap application itself does not charge any fees, but you will need to pay for gas on the Ethereum network. Make sure that you have enough ETH at your disposal for at least four smart contract transactions.
How does the swap work (TLDR)?
Token swap happens in two main steps. First, you swap your interim ERC-20 ZIL for another ERC-20 ZIL on the Ethereum network called the bridged ERC-20 token or eZIL using the token swap interface: tokenswap.zilliqa.com. Second, you convert your eZIL tokens to native ZIL on the Zilliqa mainnet by moving them over the bridge by using the X-Bridge interface: https://xbridge.zilliqa.com/.
In the sections below, we describe the swap process in more detail.
Questions?
Please go through the rest of the tutorial as it should answer all questions that you may have. However, if you are still unsure or stuck and would like to get some help, join our Telegram community: https://t.me/zilliqachat.
How to swap?
Swapping your interim ERC20 tokens is a simple process. We explain below the steps involved with some screenshots to guide you through the process. While swapping your tokens, you may pause at any step or sub-step and restart later at your convenience.
Step 1: Prepare your Metamask wallet
The token swap dApp assumes that your interim ERC-20 ZIL tokens are held in an account address that can be accessed via the Metamask browser extension. In case your tokens are held in a Ledger hardware wallet, you will have to import the Ledger account into Metamask. Follow this tutorial to connect Ledger account with Metamask https://blog.zilliqa.com/how-to-connect-ledger-with-metamask/
However, if you cannot access your account via Metamask, you will need to transfer your tokens to an account that can be accessed via Metamask.
More info on how to setup and use Metamask extension can be found on its webpage: metamask.io/
Reminder: The account holding interim ERC-20 ZIL tokens must have enough ETH to pay for gas. You will be sending at least 4 smart contract transactions from this account.
Step 2: Swapping on Ethereum for Bridged tokens aka eZIL
- Go to tokenswap.zilliqa.com and connect your Metamask extension to the token swap application by clicking on the “Connect” button on top-right.
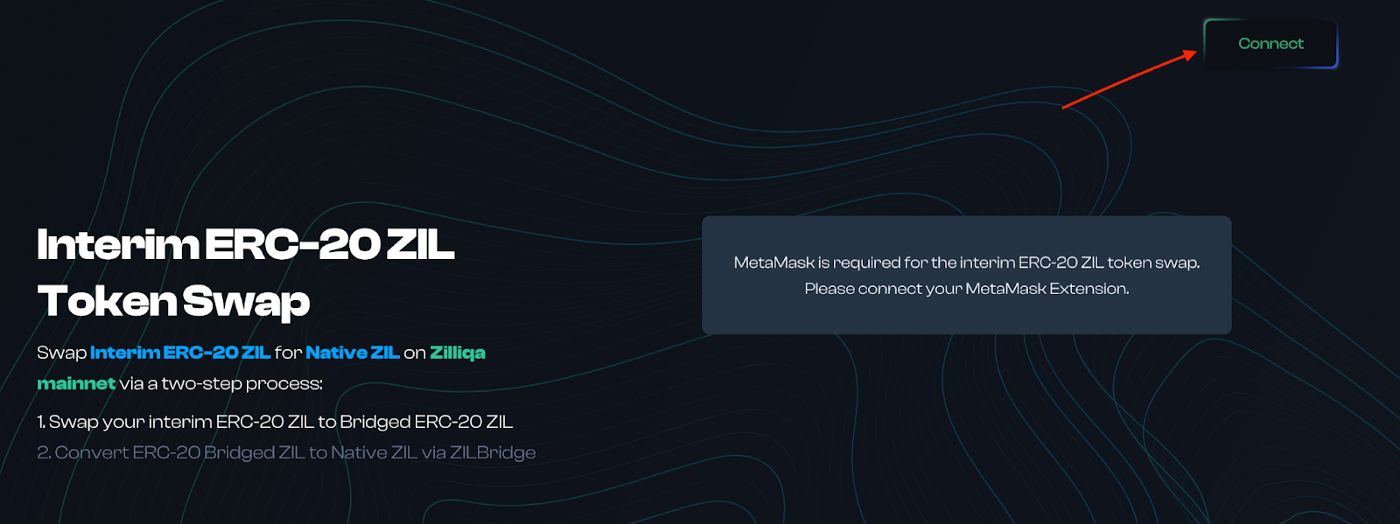
2. Once connected, you will see the below screen. The arrow points to the interim ERC-20 ZIL balance of the account.

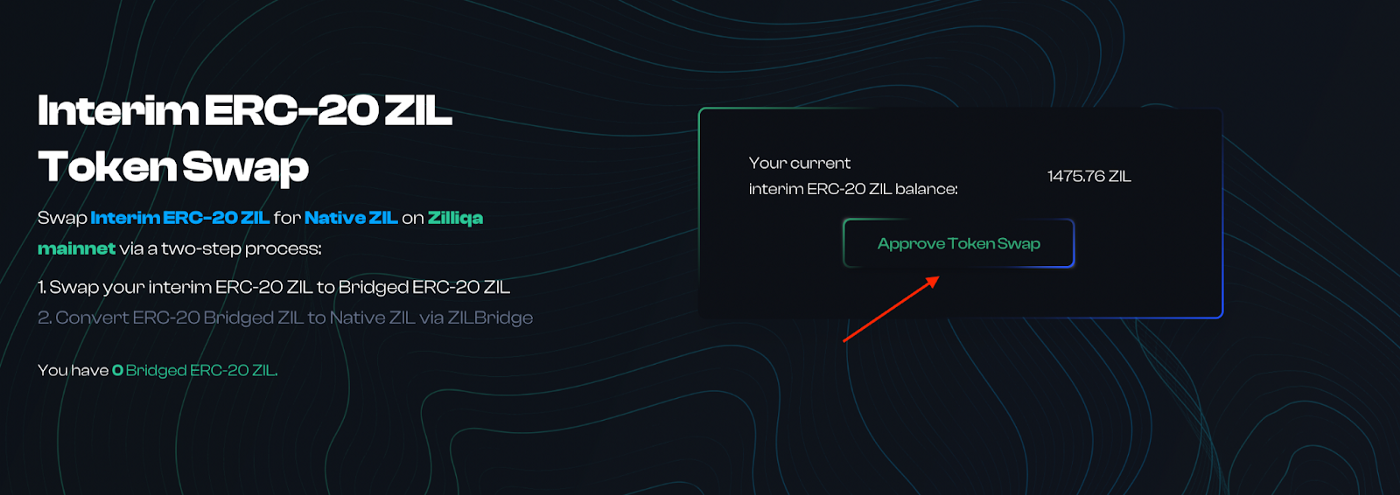
3. First-time users will then be asked to approve their tokens to be used by the swap application. Click “Approve Token Swap” as indicated in the screen below:
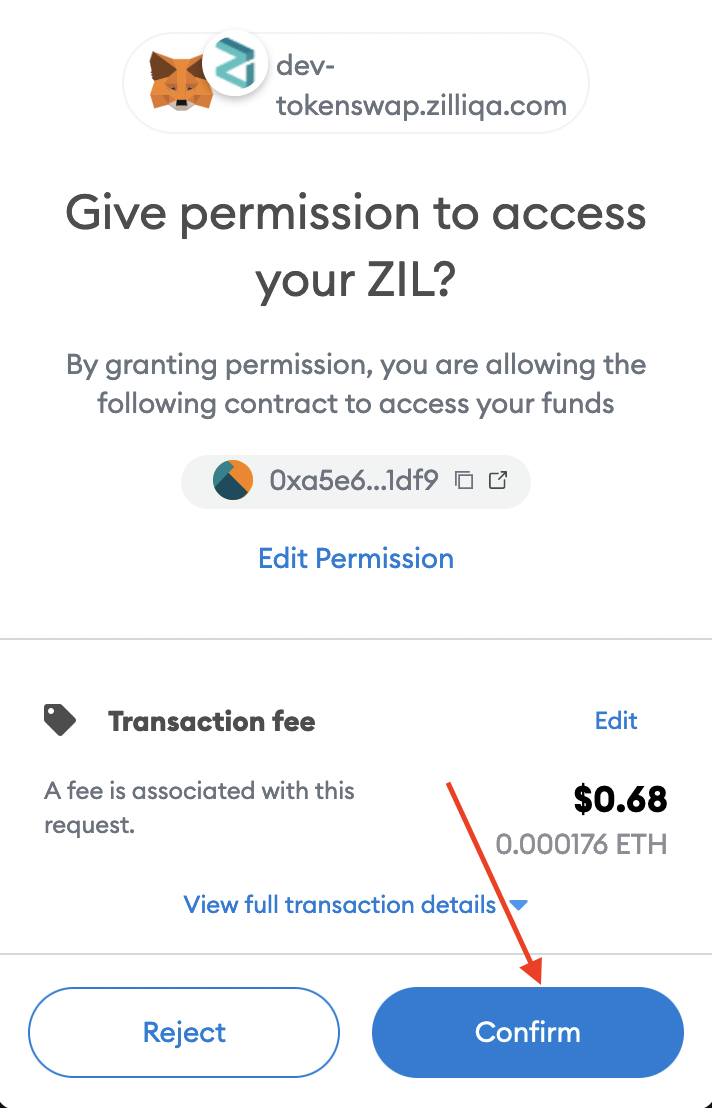
4. You will have to confirm this transaction on your Metamask extension. This will require paying gas in ETH.
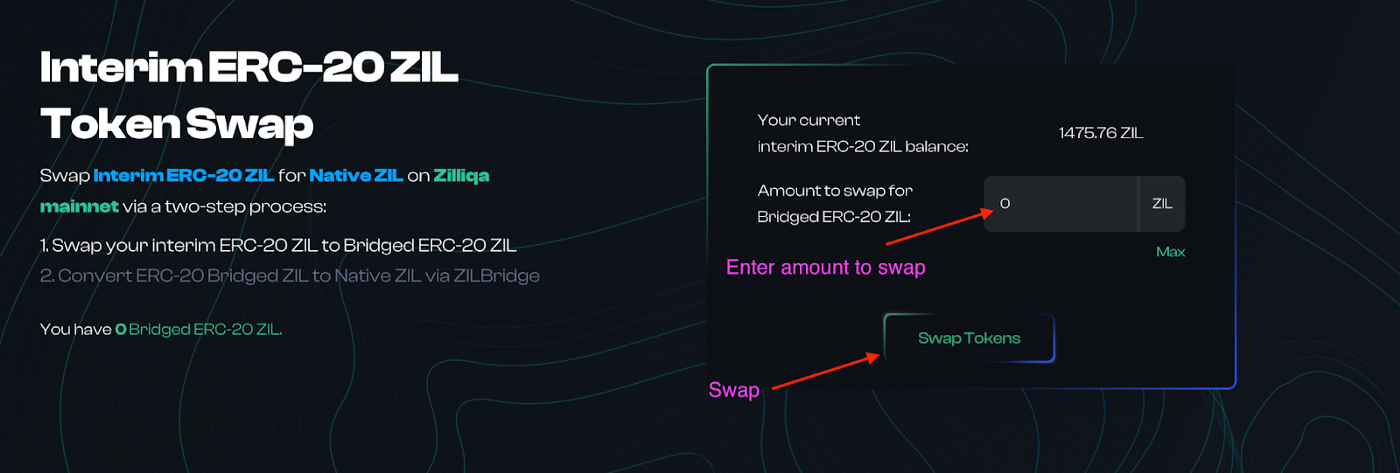
5. One the transaction is confirmed, you will see the following screen to perform the actual swap. Fill in the desired number of tokens to swap or click max for the entire balance and then click the swap button.
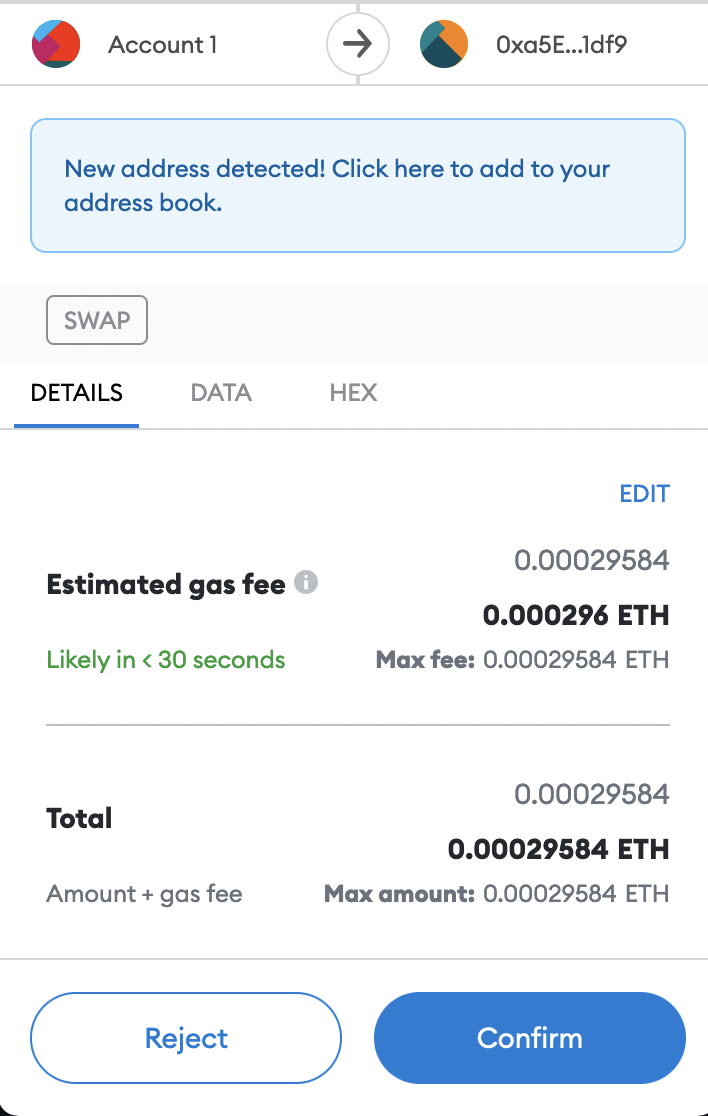
6. You will have to confirm this transaction on your Metamask extension. This will require paying gas in ETH.
7. Once the swap is successful, you will see the balance of the bridged tokens aka eZIL tokens.
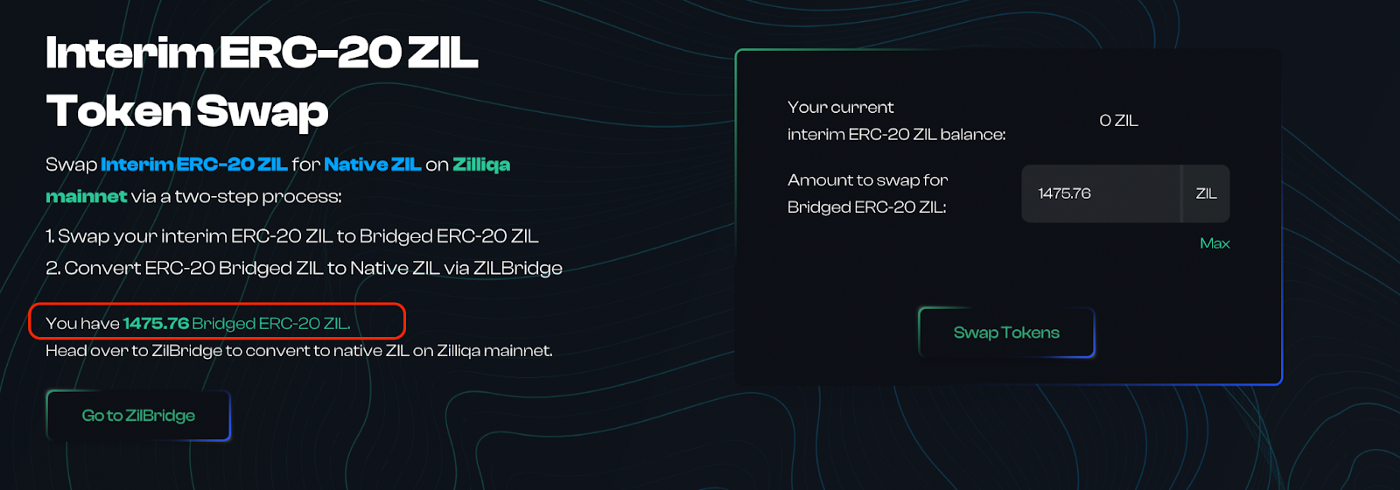
At this stage, we are halfway through. You have successfully swapped your interim ERC-20 ZIL for bridged ERC-20 ZIL. This swap is loss-less, i.e., you should expect to receive the same number of Bridged ERC-20 ZIL as the number of interim ERC-20 ZIL.
In the next step, we have to move these bridged tokens over to the Zilliqa chain and convert them into native ZIL tokens on the Zilliqa mainnet.
Step 3: Converting bridged ERC-20 tokens to native ZIL tokens.
- Go to https://xbridge.zilliqa.com/ and connect Metamask wallet.

- Once wallet is connected, choose Ethereum as source network and Zilliqa as destination chain. Select token "ZIL" from drop down, enter token amount to swap and click "Approve".
You will have to confirm this transaction in your Metamask wallet. This will require paying gas in ETH.

3. One the transaction is confirmed, you will see the following screen to perform the actual swap from eZIL token to Native ZIL token. Fill in the desired number of tokens to swap and then click on "Bridge".

Confirm the transaction in Metamask wallet.
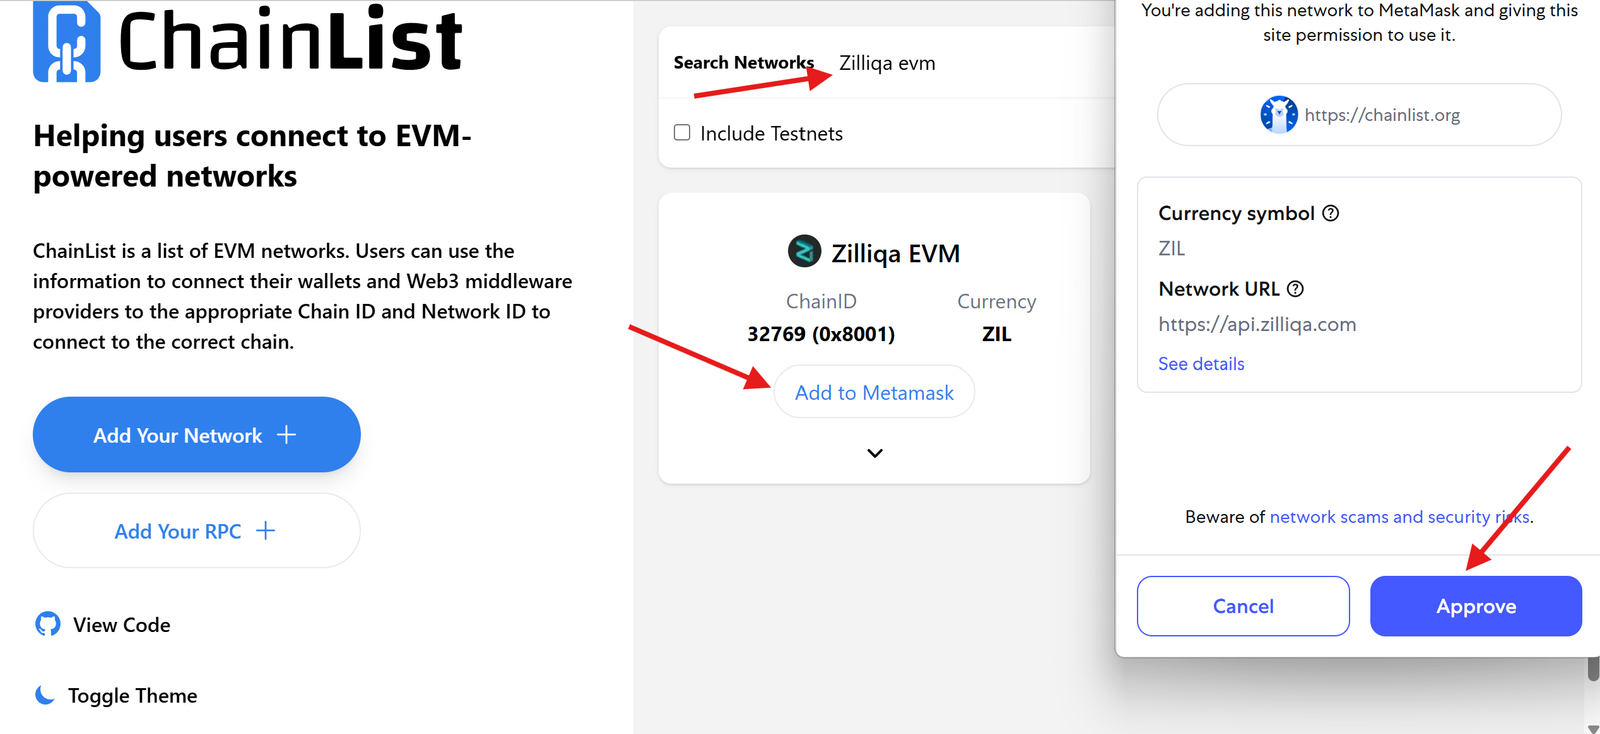
- Once the swap is successful, you will need to add Zilliqa EVM chain in Metamask wallet to view your native ZIL token.
Visit https://chainlist.org, and In the search bar, type "Zilliqa EVM". Click the "Add to Metamask". When prompted by Metamask, click "Approve" to add the network.
5. Now, You should be able to see native ZIL tokens in Metamask wallet.
